after double-clicking on the Install_Govie.bat file, the add-ons are installed automatically
after starting Blender, the entries GovieTools and GLBTextureTools appear in the Properties Panel (N key)
should there be a problem with the auto-installation, the add-ons can still be installed separately via Blender preferences
Why Govie Editor
free to use with a free account
build 3D applications without programming knowledge
expand your portfolio with additional services
no additional external partner necessary
less overhead, simpler communication
we develop features, you produce your application
Govie Tools
The Govie Tools work best together with the Govie Editor
With the help of the quick export and preview functions, the model can be tested without uploading it to the Govie platform every time.
Preview
export und preview funktion
in order to use the export function, the current blend file must be saved
now the export button can be clicked, whereby the model is exported to the GLB folder
after exporting the GLB, the filename of the exported file appears in the drop-down list
with the help of the preview, the model can now be examined
Using the visibility option, an object can be hidden or shown later in your application. Inside the preview, you can quickly check if the naming matches, and everything works as expected.
Visibility
export and preview
select an object in the scene and click on Add Property in the visibility panel
after the export is finished, the filename of the exported file appears in the drop-down list
the visibility can now be tested in the preview
if you are happy with the result and everything works as it should, the file can be uploaded to the Govie Platform to be used inside a presentation
If the visibility is set for a parent object, this also affects the child objects. With the help of empty objects, visibility groups can be created to hide or show several objects at the same time.
Visibility - Groups
visibility grouping
create an empty object which serves as a parent for the objects that should be in a visibility group
select the objects you want to group and lastly the empty object
create a parent-child relationship by pressing CTRL + P
finally, select all objects including the empty, and export them
click preview to try things out
alternatively, the whole scene can be exported if select only is unchecked in the export settings
The animation panel provides an overview of all animated objects. The identifiers of the objects and their animations can easily be edited here.
Animation
simple Animation
open the animation panel
as soon as a keyframe has been set, a new entry appears in the animation list
the title of the animation can easily be edited
after export, the animation title can be found in the preview window
Several animations can be combined by clicking the join button. After that, you can also rename the joined animation or separate it back to single keyframe animations.
Animation - Join
join animations
several animations can be combined into one NLA track
to do this, select all the objects whose animations you want to join
open the Manage Animations menu and merge the animations by clicking Join Animations
the combined animation can be renamed with Rename Animation
the merging can be undone with Separate Animation
The annotation menu provides a compact overview of all texts in the scene. Download this template and append the Annotation to have a starting point: Annotation_Text
Annotation
Add Description
create text or append the pre-made labels
position the text with the help of the empty object
easily edit the text using the annotation panel
show and hide text via visibility property
GLB TEXTURE TOOLS
Draco compression is sometimes not enough to reduce the file size. Draco essentially reduces the model geometry. If there are large textures involved, they must be scaled down separately.
Scaling Textures
Reduction of the file size through texture scaling
open the Textures menu
textures for the selected objects are displayed here
all textures in the scene can be displayed with the Show all Textures option
the target resolution and the file format can now be set in the global settings
after clicking on Scale Image, the textures are converted
AO maps can be created with one click on the bake button. After baking, the addon automatically creates a new node setup in your material, that allows you to include the AO map into the GLB File. The baking menu provides direct access to a variety of settings.
Baking AO
AO for single object
set the desired resolution and file format
set the sample rate for AO Baking (start with a low value for testing)
check unwrap if no second UV was added previously
if necessary, assign a name for the AO map (the default is AO + object name)
click on Bake Textures
if the Show Texture after Bake option is active, the baked AO map is displayed directly in the viewport
if you’ve opened a UV Editor window before, the baked texture is displayed here as well
A separate object group is created for each baked AO or lightmap. Use this to reselect objects again later. Using those groups, an individual map size can be used for baking different objects.
Baking AO - Groups
Beschriftung hinzufügen
new AO groups can be created by selecting different objects and baking them
the group can be selected using the dropdown menu
all objects of the respective group are selected by clicking on the mouse pointer icon right to its name
if an object has already been unwrapped, the unwrapping setting can be unchecked
for the final bake, the sample rate can be increased until the desired quality has been achieved
If a UV map has already been generated, the baking can be done without additional unwrap.
Baking AO - No Unwrap
no unwrap
ensure that a second UV map is already available
this UV map must be called Lightmap
now the Unwarp checkbox can be deactivated
If the Show Textures checkbox is deactivated, the AO map can be displayed later using the Preview Bake Texture
Detailed documentation of the menu items
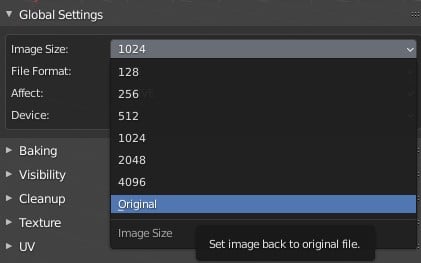
Global Settings
these settings affect many other functions of the add-on
output resolution
Image size
important for baking and scaling of textures
if the original is selected before scaling, the original textures are restored
file format
File format
JPG – much smaller than PNG, but lossy
PNG – lossless compression with alpha channel
affect
Affect
refers to the functions in the visibility panel
affect is used when switching between original and baked material
ACTIVE – the active and therefore last selected object
SELECTED – all selected objects
VISIBLE – all visible objects in the scene
SCENE – all objects in the scene
compute device
Compute Device
CPU – often slower than dedicated graphics card, but uses main memory of the PC and therefore doesn’t run out of memory that quickly
GPU – should be selected if a dedicated graphics card is available and the scene to be baked is not too large
Bake Settings
First, you need to set the bake type. Each type has its own specific options.
Bake types
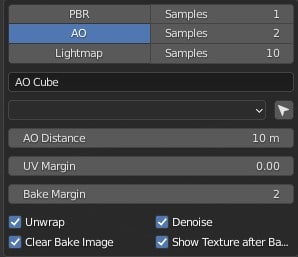
There are 3 different bake types within the bake settings: Physical Based-, Ambient Occlusion- and Lightmap Bake
The number of samples can be set separately for each bake type. The higher the value, the better the end result, but the longer the waiting times!
PBR Bake
Allows you to transfer Blender’s custom node-setups into the GLB format (e.g. color ramps, RGB curves, procedural textures). The sample value can usually be left at 1. A higher value is only recommended for baking procedural textures.
Mute Texture Mapping – deactivates all texture mapping nodes for the duration of the baking process and should be activated by default
Ambient Occlusion Bake
This can be used to create AO maps for individual objects and groups of objects.
AO Distance – defines the size of the ambient shadow
A good value is between 0.1 and 1 and results in much less noise!
UV Margin – determines how much space is left between the individual UVs
Bake Margin – n-pixels are baked beyond the UV border to prevent visible seams
Unwrap – defines whether a new UV Set, with the identifier Lightmap, should be created
Denoise – uses a bilateral blur to soften the AO map
Lightmap Bake
Lightmaps are integrated into the existing material as emission nodes. The Govie Editor then inserts the lightmap into the lightmap channel. This is a workaround because the GLTF Format currently doesn’t support lightmaps.
Lightmap in Viewer – deactivate the camera light in the viewer or the diffuse light in the finished govie so the lightmap becomes more visible
Denoise – uses an AI-based approach to create a noise-reduced lightmap from color, normal and diffuse maps
Show Texture after Bake – the baked texture is displayed on the object (via Emission Shader)
Visibility
The visibility menu is used to switch between the original and the newly created, baked material. What material is displayed depends on the selected bake type (PBR, AO, Lightmap) and the affect setting.
Show original material – if a baked material is available (with “Bake” in the material name), this will switch back to the original material
Preview Bake Material
Previously baked AO- and lightmaps can be examined using the preview function before the model is exported.